jsurfer's language selection page >
jsurfer's homepage >
Web Apps >
On-the-Fly Auto translation by ChatGPT -From English to Japanese-
- "With html tags" version -
Created on: August 21, 2023
Last updated on: September 01, 2023
Web App which translates English Web page into Japanese on-the-fly by using OpenAI API(ChatGPT) "with html tags".
What you will need:
1) OpenAI API Key (Only paid users can get this API Key)
2) Python (I used Python3 on my MacBook Pro 16-inch, 2019. As of August 31, 2023, the latest MacOS has only Python3 so if you have the lastet MacOS, use 'python3' command instead of 'python' command or else you will get an error.)
3) requests (Library to get Web page data)
4) Flask (Web Application Framework for Python)
How this Web App works:
The user enters URL of ENGLISH web page to translate on the Web form (index.html)
The server gets the URL (app.py)
ChatGPT translates to Japanese (app.py)
Display translated contents in a new web page (translated.html)
==========
If you just want to see the Web App working, just read this section.
1. Download the zipped file
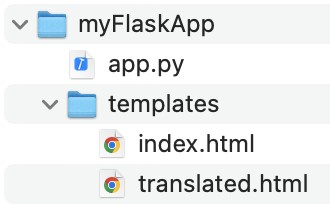
2. Unzip the zipped file and make sure the directory structure is this:
3. Open 'app.py' with any text editor app and replace "ENTER-YOUR-API-KEY-HERE" with your API Key and save.
4. Launch Terminal and run the next 3 commands to install 'flask', 'openai', and 'requests' packages. If you already have them installed, you can skip this step though it will not hurt to run:


5. Run this line to change the current directory to 'myFlaskApp':

6. Run this line to launch 'app.py' (If you are using 'python3', replace 'python' with 'python3'):

If you see this in your Terminal window, the Web App is running as expected:

Now you can just open 'http://127.0.0.1:5000/' from your web browser to see the URL entry form. Just paste the URL of English web page that you want ChatGPT to translate to Japanese and click on the 'Translate' button to translate and you should see the translation.
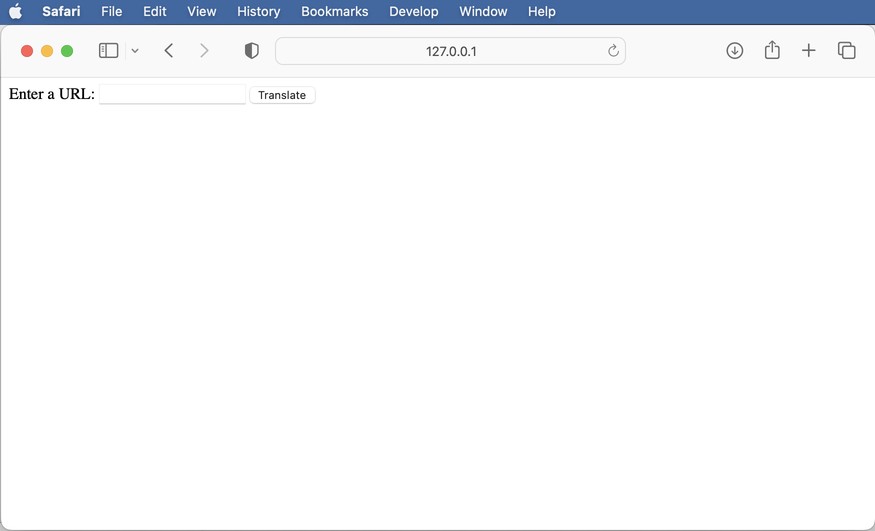
This is the initial screen that you see:
Let's just translate one of my personal web pages. The URL is http://cheezsj.com/ios/ios_en.html :

Paste the URL and then click on the 'Translate' button:

And you should see the translation screen which is this:

==========
Just for your info, below is what I did to develop this Web App:
1. Run these 3 commands to install packages:
$pip install flask
$pip install openai
$pip install requests
2. Create python script and save the it with filename 'app.py' (The actual files are in this zipped file)
3. Create html file for the user to enter URL and save it with filename 'index.html' under templates folder.
Also, create html file to display Japanese translation and save it with filename 'translated.html' under templates folder
4. Make sure the directory structure is this:
5. Run the actual Web App by running this line (If you are using python3, replace 'python' command with 'python3' command):
If you see this in your Terminal window, the Web App is running as expected:
Now just open a web browser and point to http://127.0.0.1:5000/ and you should see URLentry form. Just enter the URL of the English web page and click on the 'Translate' button to see the Japanse translation.
jsurfer's homepage >
Web Apps >
On-the-Fly Auto translation by ChatGPT -From English to Japanese-
- "With html tags" version -
Created on: August 21, 2023
Last updated on: September 01, 2023
Web App which translates English Web page into Japanese on-the-fly by using OpenAI API(ChatGPT) "with html tags".
What you will need:
1) OpenAI API Key (Only paid users can get this API Key)
2) Python (I used Python3 on my MacBook Pro 16-inch, 2019. As of August 31, 2023, the latest MacOS has only Python3 so if you have the lastet MacOS, use 'python3' command instead of 'python' command or else you will get an error.)
3) requests (Library to get Web page data)
4) Flask (Web Application Framework for Python)
How this Web App works:
The user enters URL of ENGLISH web page to translate on the Web form (index.html)
The server gets the URL (app.py)
ChatGPT translates to Japanese (app.py)
Display translated contents in a new web page (translated.html)
==========
If you just want to see the Web App working, just read this section.
1. Download the zipped file
2. Unzip the zipped file and make sure the directory structure is this:
3. Open 'app.py' with any text editor app and replace "ENTER-YOUR-API-KEY-HERE" with your API Key and save.
4. Launch Terminal and run the next 3 commands to install 'flask', 'openai', and 'requests' packages. If you already have them installed, you can skip this step though it will not hurt to run:
5. Run this line to change the current directory to 'myFlaskApp':
6. Run this line to launch 'app.py' (If you are using 'python3', replace 'python' with 'python3'):
If you see this in your Terminal window, the Web App is running as expected:
Now you can just open 'http://127.0.0.1:5000/' from your web browser to see the URL entry form. Just paste the URL of English web page that you want ChatGPT to translate to Japanese and click on the 'Translate' button to translate and you should see the translation.
This is the initial screen that you see:
Let's just translate one of my personal web pages. The URL is http://cheezsj.com/ios/ios_en.html :
Paste the URL and then click on the 'Translate' button:
And you should see the translation screen which is this:
==========
Just for your info, below is what I did to develop this Web App:
1. Run these 3 commands to install packages:
$pip install flask
$pip install openai
$pip install requests
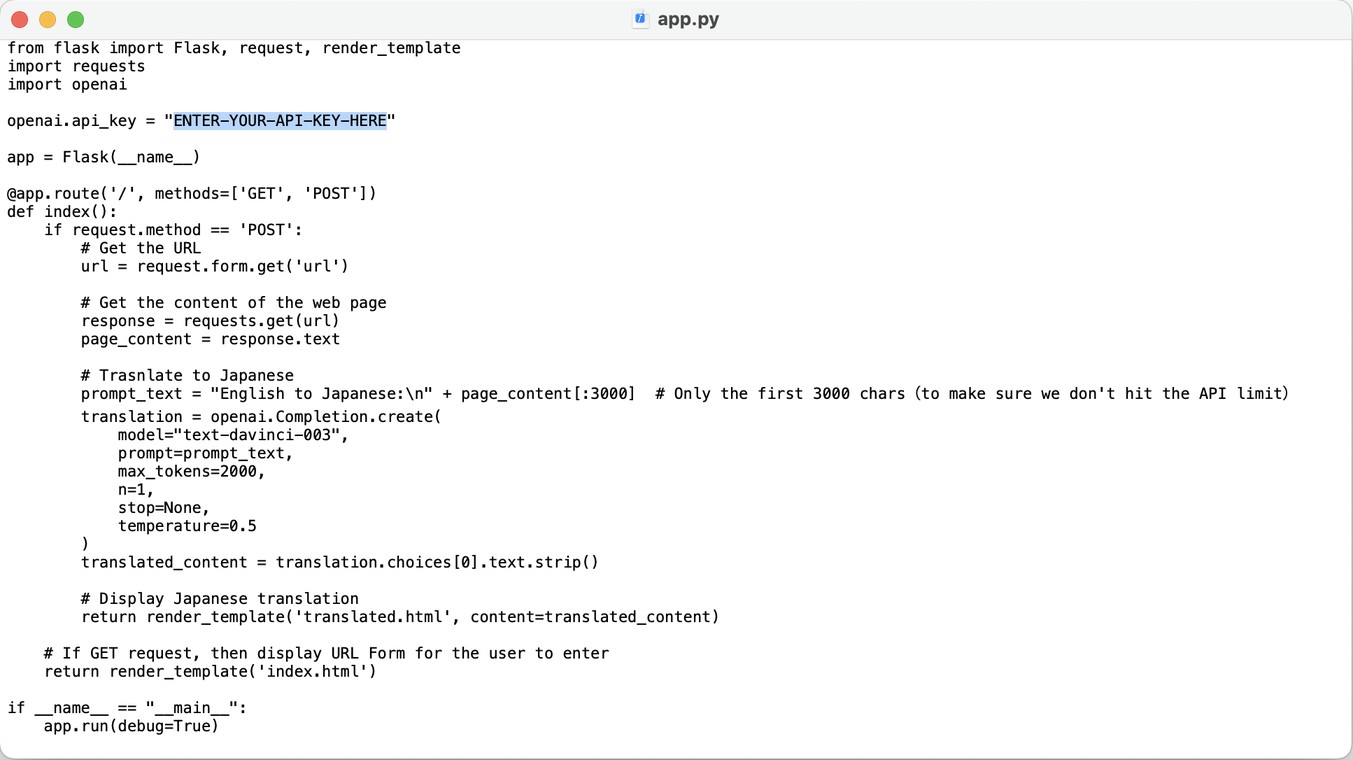
2. Create python script and save the it with filename 'app.py' (The actual files are in this zipped file)
from flask import Flask, request, render_template
import requests
import openai

openai.api_key = "ENTER-YOUR-API-KEY-HERE"

app = Flask(__name__)

@app.route('/', methods=['GET', 'POST'])
def index():
    if request.method == 'POST':
        # Get the URL
        url = request.form.get('url')

        # Get the content of the web page
        response = requests.get(url)
        page_content = response.text

        # Trasnlate to Japanese
        prompt_text = "English to Japanese:\n" + page_content[:3000]  # Only the first 3000 chars(to make sure we don't hit the API limit)
        translation = openai.Completion.create(
            model="text-davinci-003",
            prompt=prompt_text,
            max_tokens=2000,
            n=1,
            stop=None,
            temperature=0.5
        )
        translated_content = translation.choices[0].text.strip()

        # Display Japanese translation
        return render_template('translated.html', content=translated_content)

    # If GET request, then display URL Form for the user to enter
    return render_template('index.html')

if __name__ == "__main__":
    app.run(debug=True)
|
3. Create html file for the user to enter URL and save it with filename 'index.html' under templates folder.
<!DOCTYPE html>
<html>
<head>
    <title>URL Translator</title>
</head>
<body>
    <form action="/" method="post">
        <label for="url">Enter a URL:</label>
        <input type="text" name="url" id="url">
        <button type="submit">Translate</button>
    </form>
</body>
</html>
|
Also, create html file to display Japanese translation and save it with filename 'translated.html' under templates folder
<!DOCTYPE html>
<html>
<head>
    <title>Translated Page</title>
</head>
<body>
    <h1>Translated Content:</h1>
    <div>{{ content }}</div>
    <a href="/">Back</a>
</body>
</html>
|
4. Make sure the directory structure is this:
5. Run the actual Web App by running this line (If you are using python3, replace 'python' command with 'python3' command):
If you see this in your Terminal window, the Web App is running as expected:
Now just open a web browser and point to http://127.0.0.1:5000/ and you should see URLentry form. Just enter the URL of the English web page and click on the 'Translate' button to see the Japanse translation.
