jsurfer's language selection page >
jsurfer のホームページ(日本語) >
Web アプリ >
リアルタイム自動翻訳&自動要約 by ChatGPT
作成日:2023年09月25日
最終更新日:2023年09月25日
OpenAI API を使って ChatGPTで Webページをリアルタイムで翻訳して、尚且つ要約をする Web アプリです。
サポートしている言語は下記の 12言語ですが、容易に言語を追加することが出来ます:
英語
ドイツ語
スペイン語
フランス語
イタリア語
オランダ語
ポルトガル語(ブラジル)
スウェーデン語
日本語
中国語(簡体字 - かんたいじ。主に中国本土やシンガポールで使用されている)
中国語(繁体字 - はんたいじ。主に香港やマカオ、台湾で使用されている)
韓国語
必要なもの:
1) OpenAIのAPIキー(OpenAI の有料ユーザーのみ取得可能)
2) Python (私は2019年の MacBook Pro 16-inch の Terminal アプリの Python3 を使いました。2023年09月25日の時点での最新の macOS (Ventura, Version 13.6)には Python3 のみがインストールされていて、'python' コマンドで実行する古い pythonのバージョンはインストールされていません。なので最新の macOS を使う場合はこのページにある 'python' コマンドをすべて 'python3' に変更して、'pip' コマンドもすべて'pip3' に変更して実行してください)
3) requests (Webページを取得するためのライブラリ)
4) Flask (Python用の Webアプリケーションフレームワーク)
5) langdetect (言語を自動検出するライブラリ)
この Webアプリの仕組み:
ユーザーが Webフォームを通じて URL を入力。(index.html)
サーバーがその URL のウェブページの内容を取得。(app.py)
その URL のウェブページで使用されている言語を検出。(app.py)
その内容を ChatGPT を使って Target の言語に翻訳して要約。 (app.py)
翻訳した内容と要約を新しいウェブページとしてユーザーに表示。(translated.html)
==========
とりあえずこの Web アプリを使ってみたいという方はこのセクションを読んでください。
1. 必要なスクリプトとhtml を zip ファイルにしたので、ここからダウンロードする
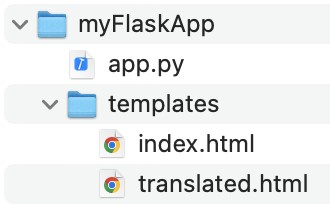
2. Zip ファイルを解凍してディレクトリの構成を下記のようにしておく:
3. app.py を「テキストエディット」等のテキスト編集アプリを使って開き、"ENTER-YOUR-API-KEY-HERE"の部分を自分の API Key に変更して保存する

4. Terminal アプリを起動して、以下の 4つのコマンドを使用して flask と openai と requests と langdetect のパッケージをインストールする。python3 を使用している場合は "pip" の部分を "pip3"に置き換えてください。(これらのパッケージがインストール済みの場合はこのステップはスキップしてください。間違えて再度実行しても問題はありません。)


5. 下記のラインを実行して、カレントディレクトリを[myFlaskApp]に変更する:

6. 下記のラインを実行して、app.py を起動する(python3 を使っている場合は "python" の部分を "python3"に置き換える):

下記の画面が表示されれば正常にアプリが動作しています:

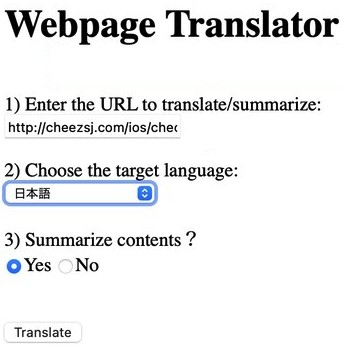
これで、Web ブラウザから http://127.0.0.1:5000/ にアクセスすると、URL を入力するフォームが表示されます:
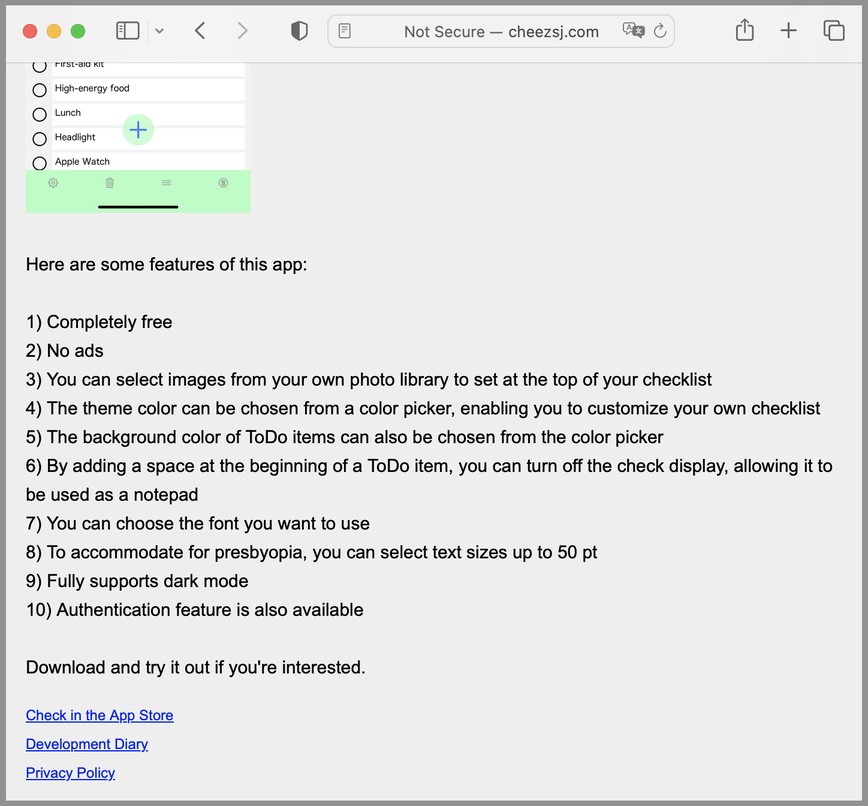
試しにこの私の英語のページを ChatGPT に訳してもらい、要約もしてもらいましょう。URL は http://cheezsj.com/ios/checkitoffyo/ios_checkitoffyo_en.html です:

.
.
.
URL をペーストして、'日本語'を選び、'Yes'を選んでから、[Translate]ボタンをクリックします:

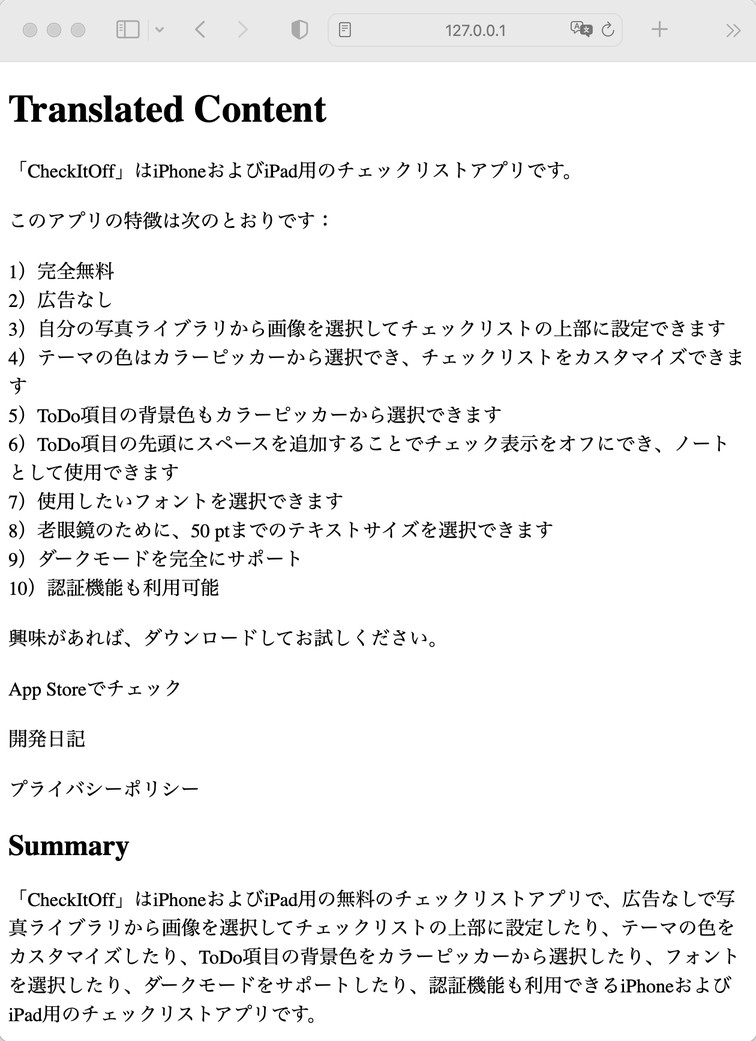
結果がこれです。日本語に訳されて、要約もされています:
==========
参考までに下記がこの Web アプリを開発するのに私がやったことです:
1. 必要なパッケージのインストール:
最初に、以下のコマンドを使用して必要なパッケージをインストールします。(python3 を使っている場合は "pip" の部分を "pip3"に置き換える)
$pip install flask
$pip install openai
$pip install requests
$pip install langdetect
2. Python スクリプトの作成:
以下の Python スクリプトを app.py などの名前で保存します。(実際の app.py スクリプトとhtml ファイルを zip ファイルにしたので、ここからダウンロードしてください。)
3. HTML ファイルの作成:
以下の内容で templates ディレクトリ内に index.html ファイルを作成します。
以下の内容で templates ディレクトリ内に translated.html ファイルも作成します。
4. ディレクトリの構成が下記のようになっているのを確認します:
5. Flask アプリケーションの実行:
ターミナルで以下のコマンドを実行し、app.py を起動する(python3 を使っている場合は "python" の部分を "python3"に置き換える):
下記の画面が表示されれば正常にアプリが動作しています:
この状態で、Web ブラウザから http://127.0.0.1:5000/ にアクセスすると、URL を入力するフォームが表示されます。URL をペーストして、訳したい言語を選択して、'Yes'を選んでから、[Translate]ボタンをクリックすると、そのページの内容が日本語に翻訳されて、要約もされて表示されます。
jsurfer のホームページ(日本語) >
Web アプリ >
リアルタイム自動翻訳&自動要約 by ChatGPT
作成日:2023年09月25日
最終更新日:2023年09月25日
OpenAI API を使って ChatGPTで Webページをリアルタイムで翻訳して、尚且つ要約をする Web アプリです。
サポートしている言語は下記の 12言語ですが、容易に言語を追加することが出来ます:
英語
ドイツ語
スペイン語
フランス語
イタリア語
オランダ語
ポルトガル語(ブラジル)
スウェーデン語
日本語
中国語(簡体字 - かんたいじ。主に中国本土やシンガポールで使用されている)
中国語(繁体字 - はんたいじ。主に香港やマカオ、台湾で使用されている)
韓国語
必要なもの:
1) OpenAIのAPIキー(OpenAI の有料ユーザーのみ取得可能)
2) Python (私は2019年の MacBook Pro 16-inch の Terminal アプリの Python3 を使いました。2023年09月25日の時点での最新の macOS (Ventura, Version 13.6)には Python3 のみがインストールされていて、'python' コマンドで実行する古い pythonのバージョンはインストールされていません。なので最新の macOS を使う場合はこのページにある 'python' コマンドをすべて 'python3' に変更して、'pip' コマンドもすべて'pip3' に変更して実行してください)
3) requests (Webページを取得するためのライブラリ)
4) Flask (Python用の Webアプリケーションフレームワーク)
5) langdetect (言語を自動検出するライブラリ)
この Webアプリの仕組み:
ユーザーが Webフォームを通じて URL を入力。(index.html)
サーバーがその URL のウェブページの内容を取得。(app.py)
その URL のウェブページで使用されている言語を検出。(app.py)
その内容を ChatGPT を使って Target の言語に翻訳して要約。 (app.py)
翻訳した内容と要約を新しいウェブページとしてユーザーに表示。(translated.html)
==========
とりあえずこの Web アプリを使ってみたいという方はこのセクションを読んでください。
1. 必要なスクリプトとhtml を zip ファイルにしたので、ここからダウンロードする
2. Zip ファイルを解凍してディレクトリの構成を下記のようにしておく:
3. app.py を「テキストエディット」等のテキスト編集アプリを使って開き、"ENTER-YOUR-API-KEY-HERE"の部分を自分の API Key に変更して保存する
4. Terminal アプリを起動して、以下の 4つのコマンドを使用して flask と openai と requests と langdetect のパッケージをインストールする。python3 を使用している場合は "pip" の部分を "pip3"に置き換えてください。(これらのパッケージがインストール済みの場合はこのステップはスキップしてください。間違えて再度実行しても問題はありません。)
5. 下記のラインを実行して、カレントディレクトリを[myFlaskApp]に変更する:
6. 下記のラインを実行して、app.py を起動する(python3 を使っている場合は "python" の部分を "python3"に置き換える):
下記の画面が表示されれば正常にアプリが動作しています:
これで、Web ブラウザから http://127.0.0.1:5000/ にアクセスすると、URL を入力するフォームが表示されます:
試しにこの私の英語のページを ChatGPT に訳してもらい、要約もしてもらいましょう。URL は http://cheezsj.com/ios/checkitoffyo/ios_checkitoffyo_en.html です:
.
.
.
URL をペーストして、'日本語'を選び、'Yes'を選んでから、[Translate]ボタンをクリックします:
結果がこれです。日本語に訳されて、要約もされています:
==========
参考までに下記がこの Web アプリを開発するのに私がやったことです:
1. 必要なパッケージのインストール:
最初に、以下のコマンドを使用して必要なパッケージをインストールします。(python3 を使っている場合は "pip" の部分を "pip3"に置き換える)
$pip install flask
$pip install openai
$pip install requests
$pip install langdetect
2. Python スクリプトの作成:
以下の Python スクリプトを app.py などの名前で保存します。(実際の app.py スクリプトとhtml ファイルを zip ファイルにしたので、ここからダウンロードしてください。)
from flask import Flask, request, render_template
import requests
import openai
from bs4 import BeautifulSoup
from langdetect import detect

openai.api_key = "ENTER-YOUR-API-KEY-HERE"

app = Flask(__name__)

@app.route('/', methods=['GET', 'POST'])
def index():
    if request.method == 'POST':
        # Get URL from the user's input
        url = request.form.get('url')
        chosen_language = request.form.get('language')
        # Get user's choice on summarize or not
        summarize_choice = request.form.get('summarize', 'no')

        # Set prompt based on the language
        language_mapping = {
            "en": "English",
            "jp": "日本語",
            "fr": "Français",
            "es": "Español",
            "it": "Italiano",
            "de": "Deutsch",
            "sv": "Svenska",
            "nl": "Nederlands",
            "zh_s": "简体中文",
            "zh_t": "繁體中文",
            "ko": "한국어",
            "pt_br": "Português (Brasil)"
            # Add more lang option here in the future
        }

        target_language = language_mapping.get(chosen_language, "English")

        # Get the content of the Web page
        response = requests.get(url)
        page_content = response.text

        # Get rid of HTML tags
        soup = BeautifulSoup(page_content, 'html.parser')
        text_only = soup.get_text()

        # Detect the language from the content of the Web page
        detected_lang = detect(text_only)

        # Translate to the target language
        if detected_lang == chosen_language:
            # Do not attemp to translate of target lang is same as detected lang
            translated_content = text_only
            # Translate and also trim the text to the first 3000 characters to be retrieved from the web page
            summary_prompt = "Summarize this text:\n" + text_only[:3000]
        else:
            # Translate and also trim the text to the first 3000 characters to be retrieved from the web page
            prompt_text = f"Translate from {detected_lang} to {target_language}:\n" + text_only[:3000]
            translation = openai.Completion.create(
                model="text-davinci-003",
                prompt=prompt_text,
                max_tokens=2000, # The model limits the generated text to 2000 tokens
                n=1,
                stop=None,
                temperature=0.5
            )
            translated_content = translation.choices[0].text.strip()
            summary_prompt = "Summarize this text in {target_language}:\n" + translated_content


        translated_content = translated_content.replace("\n", "<br>")  # Replace new line with "br"

        if summarize_choice == 'yes':
            # Summarize the web page
            summary = openai.Completion.create(
                model="text-davinci-003",
                prompt=summary_prompt,
                max_tokens=500,
                n=1,
                stop=None,
                temperature=0.5
            )
            summarized_content = summary.choices[0].text.strip()
            print(f"DEBUG: Summarized content is: {summarized_content}")  # Display info for debugging
        else:
            summarized_content = "Summary not requested."


        # Display the translation and the summary
        return render_template('translated.html', content=translated_content, summary=summarized_content)

    # For GET requests, display a form to input the URL
    return render_template('index.html')

if __name__ == "__main__":
    app.run(debug=True)
|
3. HTML ファイルの作成:
以下の内容で templates ディレクトリ内に index.html ファイルを作成します。
<!DOCTYPE html>
<html>
<head>
  <title>Translation Service</title>
</head>
<body>

  <h1>Webpage Translator</h1>

  <form action="/" method="post">
    <br>
    <label for="url">1) Enter the URL to translate/summarize:</label><br>
    <input type="text" id="url" name="url"><br><br>

    <label for="language">2) Choose the target language:</label><br>
    <select id="language" name="language">
      <option value="en">English</option>
      <option value="de">Deutsch</option>
      <option value="es">Español</option>
      <option value="fr">Français</option>
      <option value="it">Italiano</option>
      <option value="nl">Nederlands</option>
      <option value="pt_br">Português (Brasil)</option>
      <option value="sv">Svenska</option>
      <option value="jp">日本語</option>
      <option value="zh_s">简体中文</option>
      <option value="zh_t">繁體中文</option>
      <option value="ko">한국어</option>
    </select><br><br>

    <label>3) Summarize contents?</label><br>
    <input type="radio" name="summarize" value="yes" checked>Yes
    <input type="radio" name="summarize" value="no">No<br><br><br>
    <input type="submit" value="Translate">
  </form>

</body>
</html>
|
以下の内容で templates ディレクトリ内に translated.html ファイルも作成します。
<!DOCTYPE html>
<html>
<head>
    <title>Translation</title>
</head>
<body>
    <h1>Translated Content</h1>
    <div>{{ content|safe }}</div>
    <h2>Summary</h2>
    <div>{{ summary }}</div>
</body>
</html>
|
4. ディレクトリの構成が下記のようになっているのを確認します:
5. Flask アプリケーションの実行:
ターミナルで以下のコマンドを実行し、app.py を起動する(python3 を使っている場合は "python" の部分を "python3"に置き換える):
下記の画面が表示されれば正常にアプリが動作しています:
この状態で、Web ブラウザから http://127.0.0.1:5000/ にアクセスすると、URL を入力するフォームが表示されます。URL をペーストして、訳したい言語を選択して、'Yes'を選んでから、[Translate]ボタンをクリックすると、そのページの内容が日本語に翻訳されて、要約もされて表示されます。
